Here we are going to tell you how to create a dynamic XML sitemap generator for WordPress without a plugin. Which will automatically add the URL to the page of sitemap.xml and along with it there will also be a process of auto generating the last modified date. For this automation sitemap, we will only use WordPress’s php functions code. All these processes will be done only from the wp admin page of WordPress.
XML sitemap plays the most important role in SEO of the website. It gives information about the complete URL structure of the website in the console of search engines like Google, Bing and Yandex. Due to which the URL of the website is easily accessible to the search engine crawler. It works as a main role in the ranking of the website. Moreover, XML sitemap is most beneficial for any website. Because XML sitemap ensures which URLs are allowed to be indexed and helps crawlers understand the post date and last modified date of the website.
What is XML Sitemap
xml sitemap is a file that contains a roadmap of all the URLs of a website. Which helps search engines like Google, Bing and Yandex to understand the structure of the website. It also helps in giving information about the date of last update of the post, page category and website tags. XML sitemaps are in the following format on a website. (wpencoding.com/sitemap.xml)
Key components of an XML sitemap
Custom dynamic XML Sitemap file contains website URLs, last modified date, change frequency, priority, image url and components. We have included URLs, last modified date, change frequency, and priority in the custom dynamic website. Which plays a major role in the structure and ranking of the website.
Benefits of Custom XML Sitemap Generator
Custom XML Sitemap Generator provides many benefits for your website. Implementing sitemap on the website is done after installing third party plugins like Yaost Seo, RankMath, and AllinOne Seo plugin. Which is dynamic but the sitemap is managed under the direction of these plugins. Sometimes due to some bugs in these third party plugins, the ranking of your website goes down. In which all the URLs present in the sitemap are affected.
But when you add Custom XML Sitemap to your website, then only a separate file of sitemap is created on your website. Which does not require updates. And minimizes plugins which speed up website performance.
Planning the Sitemap Structure
We will include posts, pages, custom post types, taxonomies all in a custom dynamic Sitemap Structure. You will be able to make changes in the code of the sitemap according to your website. Only canonical URLs are included in the sitemap URLs. If the canonical URL is working properly in your website then there will be no problem in Dynamic Sitemap Structure.
Creating the Sitemap Generation Functionality
If you do not have knowledge of php and development then it makes it very easy for you. So that your website will remain safe and secure. To add Dynamic XML Sitemap Generator code to WordPress website, first install WPCode and File Manager plugin. You can uninstall the file manager plugin later.
There are 2 ways to add the above PHP code to WordPress function. I will tell you about the safest way which will ensure that you do not face any problem in your website. Before doing this process, do not forget to take a backup of your live website.
So let’s assert this code with a WordPress function
Step 1 – Creating a PHP Function File
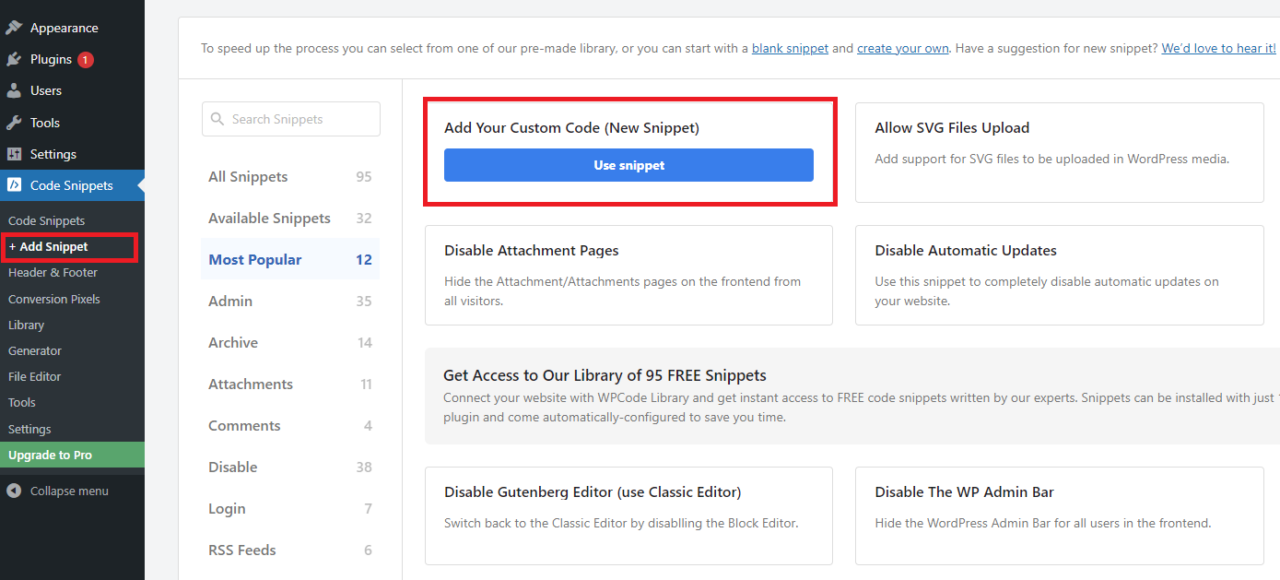
To implement PHP function code in WordPress, add a php function snippet to the WPCode snippet Click on Add Snippet and select Add Your Custom Code Snippet.

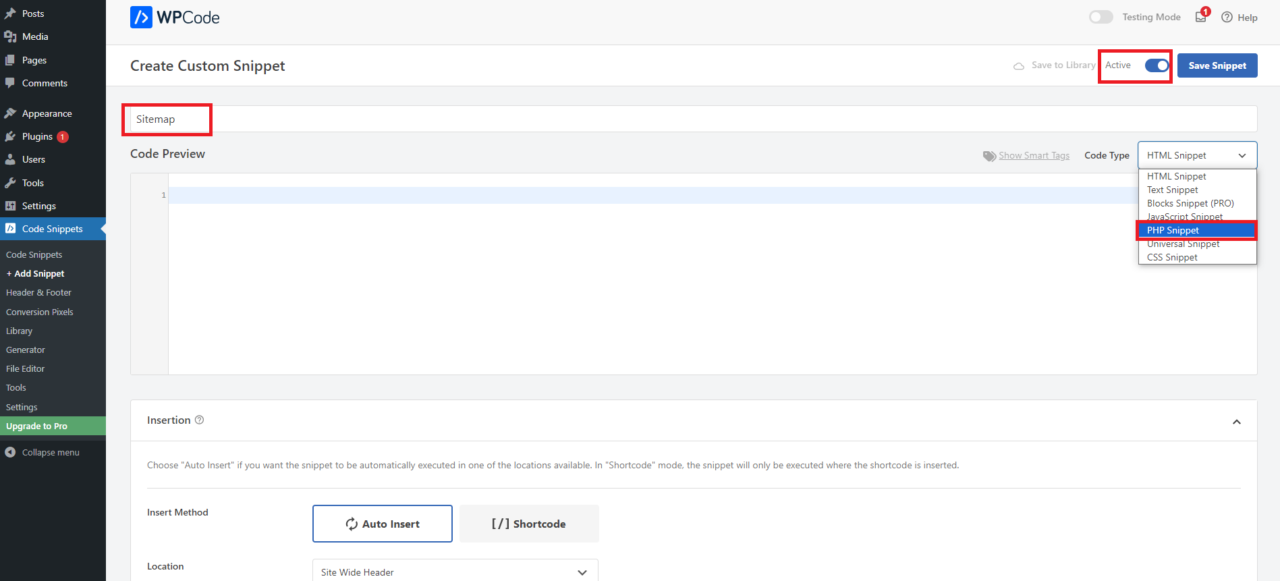
Give the custom snippet a Sitemap name and then select PHP Snippet as the code type. then turn on active

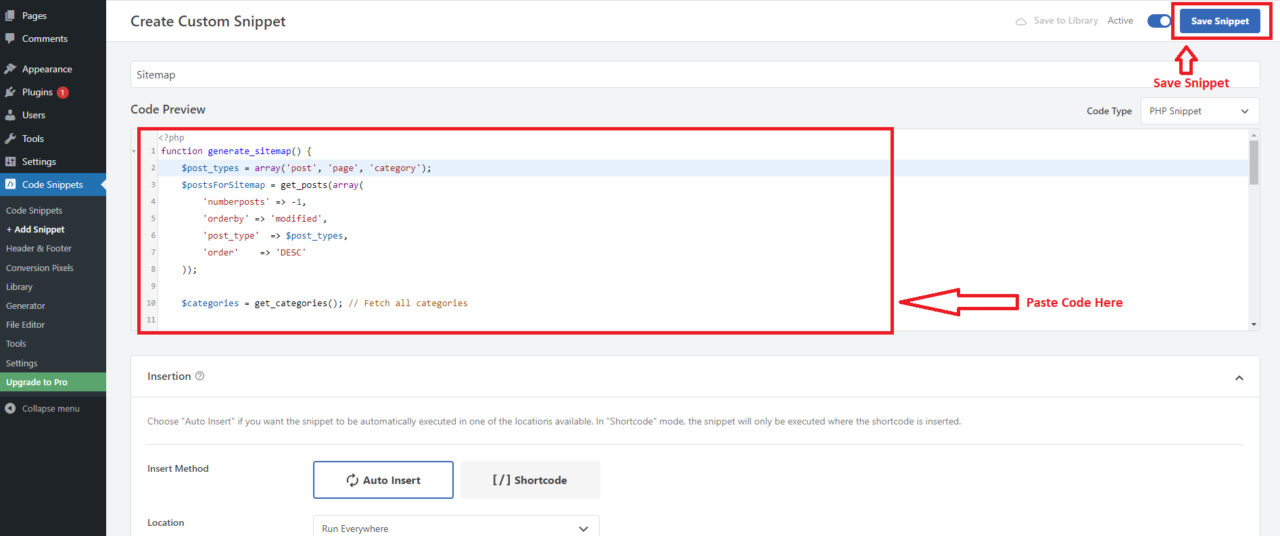
Paste the code in place of the code preview. and then save the snippet.
function generate_sitemap() {
    $post_types = array('post', 'page', 'category');
    $postsForSitemap = get_posts(array(
        'numberposts' => -1,
        'orderby' => 'modified',
        'post_type'  => $post_types,
        'order'    => 'DESC'
    ));

    $categories = get_categories();

    $sitemap = '<?xml version="1.0" encoding="UTF-8"?>';
    $sitemap .= '<urlset xmlns="http://www.sitemaps.org/schemas/sitemap/0.9">';

    foreach ($postsForSitemap as $post) {
        setup_postdata($post);
        $postdate = explode(" ", $post->post_modified);

        $sitemap .= '<url>'.
            '<loc>' . get_permalink($post->ID) . '</loc>'.
            '<lastmod>' . $postdate[0] . '</lastmod>'.
            '<changefreq>monthly</changefreq>'.
            '<priority>0.9</priority>'.
            '</url>';
    }

    foreach ($categories as $category) {
        $sitemap .= '<url>'.
            '<loc>' . get_category_link($category->term_id) . '</loc>'.
            '<lastmod>' . date('Y-m-d') . '</lastmod>'.
            '<changefreq>monthly</changefreq>'.
            '<priority>0.8</priority>'.
            '</url>';
    }

    $sitemap .= '</urlset>';

    $fp = fopen(ABSPATH . "sitemap.xml", 'w');
    fwrite($fp, $sitemap);
    fclose($fp);
}

add_action('publish_post', 'generate_sitemap');
add_action('publish_page', 'generate_sitemap');
add_action('publish_category', 'generate_sitemap');
Now the custom dynamic sitemap function is enabled on your WordPress website. To check it. Type /sitemap.xml at the end of your website’s URL and search (Ex: example.com/sitemap.xml).
Step 2 – Creating a Sitemap.xml file
If the urls are not visible on the sitemap’s URL or are redirecting to the sitemap of the seo plugin. So for this you have to disable the default sitemap of SEO plugin. Never keep 2 sitemap files on your website, this is a bad sign for SEO.
Now you need to create a file named sitemap.xml in the root directory of your website. Where all the URLs of your website will show.
Create and save a file named sitemap.xml in the root directory of the WordPress file manager. Here all the urls of your website will be auto generated and saved.

Step 3 – Testing and Validating the Sitemap
To run the sitemap function on the website, edit any post or page and save it. Now to check whether the dynamic sitemap has been generated on the website, add sitemap.xml to the last of the URL of your website.
Using online XML sitemap validators to ensure the generated sitemap is valid and error-free.
Adding Custom Post Type in Dynamic XML Sitemap
The above function code will generate WordPress’s default posts, pages, categories in the sitemap file only. If you want to add a custom post page or category with the sitemap function, simply add the custom post type URL next to “post_types=array”. Category and tag functions in sitemap will only be run from post type URL. See code below for example
function generate_sitemap() {
    $post_types = array('post', 'page', 'category', 'custompost');